You’re an eCommerce store marketing manager, Director or Online Store Owner, and you want to spread your wings into running an AdWords or Bing Ads campaign. Or maybe you’re already doing it but not seeing the results you’re looking for.
Here are a few ways to make your life easier, focus on the 80/20 and set your AdWords and Bing Ads account up for success.
Item #1: Start with Google Shopping Campaigns
This might seem like the obvious answer, but if you’re just now taking the plunge into AdWords or Bing Ads, this is the place to start. Once your feed is set up and linked to Google Merchant Center, and that’s linked to AdWords, the hard part is over. I always recommend starting with two campaigns: top sellers by volume and top sellers by margin. For the easiest segmentation, create a new column in your product feed for “custom_label_0” and assign “High Margin” to your high margin products, and “High Volume” to your high volume products. Create a new Shopping campaign in AdWords and add an inventory filter in the campaign settings.
From there, create a new adgroup and label it accordingly. Subdivide that by brand, and if you want, again by item ID. This will now assign your bids at the brand level. This makes bidding a bit easier, so rather than bidding on 500+ SKUs you’re just focusing on 20 or 25 brands. As you’ll guess, high margin products will be profitable with a higher cost-per-sale or a lower Return On Ad Spend (ROAS), while high volume products will need to have lower bids and a more strict cost-per-sale.
As data starts to come through and you find high performers, low performers, subdivide those brands by item ID and starting adjusting bids at the item ID level.
Item #2: Start your search ads with your top 1% of products
Search is a lot tougher to be profitable in than Shopping, especially given competition and the tendency to be broad with your keyword targeting. To start, rather than running keywords for entire categories or even subcategories of your store, take your top 1% of products by volume or margin and dial in those keywords. This gives you a chance to bring new business to your site while seeing an immediate return on your keyword targeting. Stick to broad match modifier keywords and exact match, and ideally give them each their own campaign.
If you find that there’s not a lot of search volume for your top 1%, expand your keyword targeting to the 3-5% of your top products. Stick to product titles or exact product names as much as possible.
Item #3: Use your site search for fast & accurate landing page URLs
One of the first complaints I get from new clients is that they never knew how to make sure users are sent to the best URL possible. This often results in them just using the category page or, even worse, home page as their destination URL. Instead, take advantage of your internal site search to save time and guarantee the best result. Not impressed with your site search or trust that it can handle complicated queries? Take a step back and learn how important site search is for any site.
Once you’ve built out all of your products and categories, open AdWords Editor and navigate to the text ads section. Highlight all of the text ads you want to have sent to search results pages and plug in your internal site search URL. For example, If I’m using www.tattly.com as an example, their site search takes the user to the following URL:
http://tattly.com/search?q=&type=product
The q= is your search query parameter string, and if I were to look for “bird,” the URL would become:
http://tattly.com/search?q=bird&type=product
See how “bird” now appears following “q=”? Now we can replicate that at scale with AdWords Editor. I’m going to assign all of my final URLs as:
http://tattly.com/search?q=*&type=product
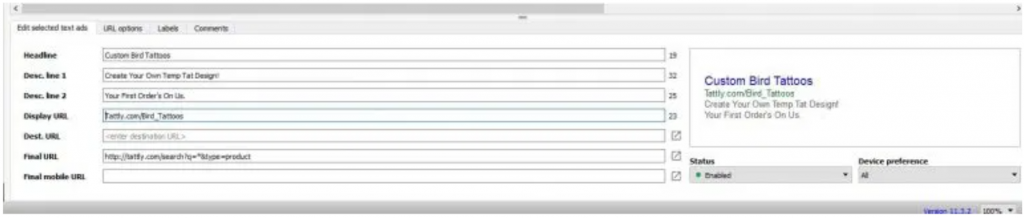
I’m going to then select all of those ad groups in bulk and, buy pressing CTRL+H, do an advanced find and replace that looks like the following:

I’m going to press enter and have the following result:

And here’s the resulting landing page:

Now, you might be asking, why are we find and replacing with the ad group name? Because your ad group is the “theme” of your keywords, and ideally you only have a limited number of keywords in each ad group. If your ad group is “bird,” and your keywords are “bird tattoos” or “custom bird tattoos,” the landing page for searching for “bird” on Tattly will probably serve you well. But if your keywords are not related to bird tattoos or custom bird tattoo designs, you might want to restructure your account and make sure those keywords and ad groups are as tightly themed as possible.
Item #4: Create a UPC- or Product Number-Focused campaign
Much like the previous action item of only targeting your top 1%, 3% or 5% of products with keywords, this campaign type seeks to take advantage of the ultimate long tail opportunity in eCommerce: product numbers or UPC numbers.
If you’re in an industry where your product is often searched for by its UPC, product #, MPN or ISBN–college textbooks, for example–campaigns like this can be a huge profit generator. Simply export a list of your products most commonly searched part specification and put them into their own campaign with exact match and broad match modifier keyword types. Pair this with using your site search for final URLs and you’ll have an incredibly high ROI campaign due to a lack of competition and exact match queries aligning perfectly.
Item #5: Start your display campaigns from the bottom of the funnel
We’ve all heard about AdRoll, Criteo and FBX for retargeting on social networks, as well as remarketing lists for search ads (RLSAs) and Display Remarketing for Google. So where do you start? The answer: the very bottom of the bottom of the funnel.
To show some ROI from remarketing campaigns, start with your customers that were so close to giving you money but, for some reason, were scared away: cart and checkout abandoners. These folks decided to give you their business, got their wallets out and stopped along the way. But why? There are quite a few reasons out there but unexpected costs, confusing checkout process and no guest checkout are definitely the leaders in this category. So start by building your audience based on visitors of your checkout pages that did not go on to convert. Build out some display assets that speak to the top three abandonment reasons: offer them free shipping, point them back to the checkout page as your final destination or consider a guest checkout to boost conversion rates.
Once you’ve launched your display assets focused on those cart abandoners, adjust your copy and bid settings until you see profitability–and trust me, you’ll see return on these audiences.
As you start hitting your goal and want to expand volume, move “up the funnel” and start targeting people who view key products or package deals and remarket to them. Again, cater your display assets to the prospect: if your audience is based on people who viewed a specific bike that you sell or a brand of bikes, your display asset should show that bike in it. Consider using dynamic ads to further support the most relevant product being shown to your customers.